


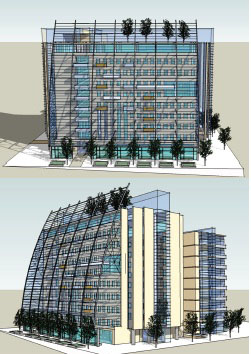
The flat screen of the computer, along with the mouse and keyboard, allow us to create three dimensional volumes and shapes. This process is called Digital Modeling. One of the best tools for digital modeling is the free modeling program, SketchUp. It offers tools to build and define quick three dimensional models. It is easy to learn to push and pull shapes and apply materials to surfaces. You can create landscapes with trees and bushes, select time of day and seasons, place people, furnishings and objects, and select simultaneous multiple views. Designers create individual work with SketchUp alongside physical models to build objects, spaces, buildings, neighborhoods and even cities. Once digitally modeled, folios of different views can be captured to provide a series of walk-throughs. You can even create walk-through animated movies and construct animations to show your project being built up in phases. Mastering the digital realm is a wonderful way to explore, experiment, capture and construct your ideas.
Digitize your dreams!
Activity 1 – model your school

Have you ever walked around your hometown or larger city and thought, I think these buildings should look a different way? Maybe you thought the height or shape of it should be changed. Well here is your chance to start making an impression on the built environment that surrounds you every day. Digital modeling has become one of the quickest and easiest ways to make massing models that convey your ideas to others. Take an image of your school from Google Earth and import it into SketchUp. Using different shapes: the square, circle and push/pull tool, create a massing lay out of buildings on the site. Add new areas around your school campus or on the roof of your school. Add a new athletic wing. Imagine changing what exists to something that would improve your school.
Activity 2 – Push, pull rotate!
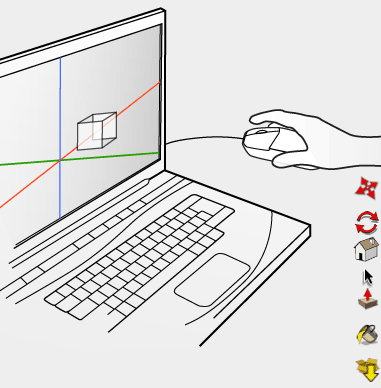
First download and open SketchUp. You will be asked to select a template in which you will design. Select the type of units you want to use to measure. There are two main types of measuring systems: US Customary UNITS (inches, feet, yards and miles) and The International System (SI) or Metric System.
Now open the Tool Bar and it will appear at the top of your SketchUp Screen. There are several simple tools.
Move – once an object is selected you can use this tool to move it along any axis.
Rotate – Allows you to rotate an object in any direction.
Views – Gives you views from all sides of you drawing, plus a plan view and an axon view.
Select – Use this tool to highlight and select objects.
Push/Pull – This tool allows you to give a flat object a height and width.
Paint Bucket – This is where you will find colors and materials that you can add to your project.
Library – This is where you will find people and trees to add to your project. Library takes you to a Google search bar where you can type in what you are looking for and download it into your project.
Experiment with these tools until you feel comfortable starting to construct something digitally. When ready, move on to activity 2.
Activity 3 – shapes and spaces
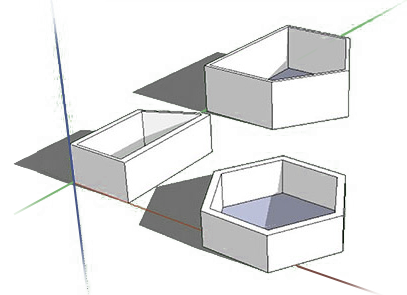
In this activity you will create a single space. Open SketchUP. Select the SI (feet and inches) units to use to measure. The space you will be building will include at least four walls and all walls must connect to make a shape. Start by using the rectangle tool which will be at the top of your screen on the toolbar. Now you click on any point on the screen and you can draw a rectangle that can have any length or width that you decide. Once you have your rectangle drawn use the push/pull tool (one that has a cube with an arrow point up) to give your wall a height, creating a 3D object. Now create three spaces that each form a different shape and height.
Activity 4 – porous masses
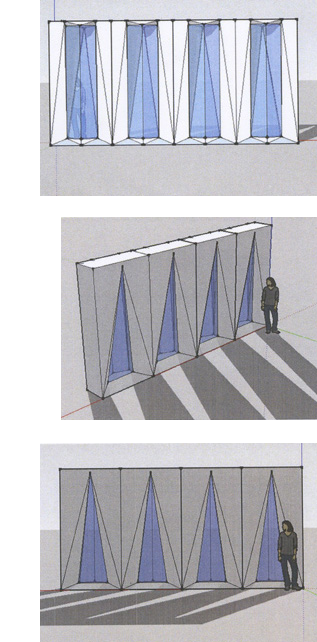
In this exercise you will experiment with creating a space and then adding different openings for different natural lighting effects. Similar to Activity 1, you will again start by creating a rectangular wall but this one will have the dimensions of 20 feet long by 1 foot wide. You can decide on what height you want the wall to be using the push/pull tool. Now that you have a 3D wall you will need to make two more copies of this wall. Instead of re-drawing the rectangle and giving it the same height, why not make a copy of the old wall and paste it next to it. To do this you will use the arrow tool and holding down the left click on the mouse, drag a box over the wall you created. This will make a lot of blue dots and lines on your wall which means that you have selected it. Using the move tool (tool with overlapping arrows pointing in four directions) and the control button on the key board, you can make a copy. Hold down the control button and left click the mouse and drag. This should create a second wall that is a copy of your original wall. Do this step one more time creating three total walls. The goal of this activity is to show how light passes through a wall using openings that vary in shape and size. On each wall you will create a series of openings that can be the same shape and size or different. On each wall make a unique pattern. When you have finished all three walls click the window tab above the toolbar and click on shadows. This will give you a pop up tool bar which will allow you to change the angle of the sun based on time of day and month. Now you will be able to see how the sun will shine through your walls based on different times of the day and year.

Activity 5 – design your world
In this final activity we are going to combine massing and openings into one project. This time you are going to find an empty lot in your hometown or a town that is close to where you live. Again you are going to import an image of the lot from Google Earth into SketchUp. Now it’s your time to shine and create a plaza, a gathering space or square, which is surrounded by buildings. You get to decide the shape and size of each building that you put on the site. Try to fit at least three buildings on the site along with one water element, two different ground materials (dirt, grass, gravel, pavement) and some trees. Also, on each of the buildings, create a series of openings for each building and add texture to the buildings such as brick, wood or concrete, to name a few. For this project you will need to use the push/pull, square, circle and paint bucket tools. Explore the SketchUp online library of objects like trees, cars and people and import some into your model.
Review
- The creation of three dimensional volumes and shapes within the flat screen of the computer is called digital modeling.
- A porous mass will allow shadows that change based on time of day and month.
- SketchUp uses which type of measuring systems?
- Which of the following are tools used in SketchUp?
- Put the following steps in order to create a space
Explore
- 3D Warehouse
- Achim Menges
- Architecture 3D Printable Models of Buildings
- Dunescape Shop Architects
- Fab Labs Getting Started
- FLotsam& Jetsam by SHOP Architects
- Fusion 360
- How to Use Basic SketchUp Tools
- Importing Images into SketchUp
- Insight Maker
- Jenny Sabin: Digital Experimentation
- Maker Bot Thing I verse Architecture Models
- Reiser & Umemoto
- Sketch Up Advanced Textures
- SketchUp Floor Plan
- SketchUp Furniture
- SketchUp Layers
- SketchUp Paint Bucket Tool (colors + materials)
- Surface Design with Algorithms
- TEDed Video about new ways of working
- Ten Tips for Beginners
- TINKERCad Free by Autodesk
- True Design Digital Modeling Services
- Video Developing & Using Models
- Visible Geology Digital Modeling
- World Builder The Future of Technology in Environments
Relate
- 2D Geometry

- Architectonics

- Architecture

- Columns

- Composition

- Design Making

- Electric Light

- Facade Elements

- Furniture Design

- House of the Future

- Landscape

- Material Matters

- Modeling

- Modern Architecture

- Pattern

- Pavilions

- Perspective

- Prairie Architecture

- Proportion

- Space

- Space Planning

- Structure

- Sunlight

- TIny House

- Topography

- Urban Design

- Walls


All contents copyright © NEXT.cc. All rights reserved. Terms of Use