


 Architectural Modeling
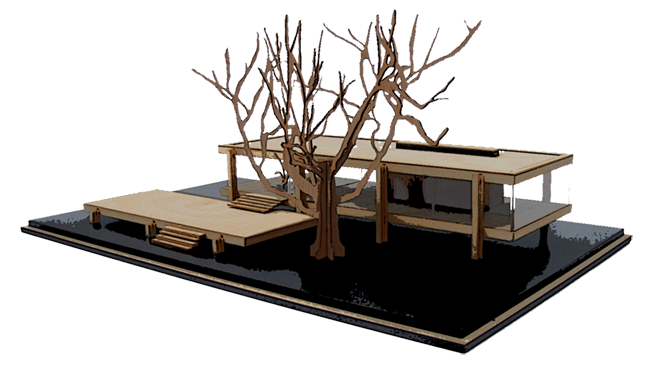
Model-making is a great tool that allows designers to showcase their ideas in 3D. Architectural models are physical representations of a design. While drawings and digital renderings can provide a sense of what a built project might feel like, well-crafted models show how the building or object would exist in physical space. They range anywhere from full-scale to thousands of times smaller. Models are built and used during every phase of the design process—from rough concepts to the final product. You can choose to laser cut your pieces for clean and precise edges, but building by hand is still the best and fastest way to begin to test ideas and develop your skills. Architectural models include quick conceptual idea models, mass or exterior form models, interior models (that often show furniture and materials), detail models of different materials coming together, and even full scale models of sections of buildings.
Activity 1 – Warm up Sketching & Making 2D to 3D
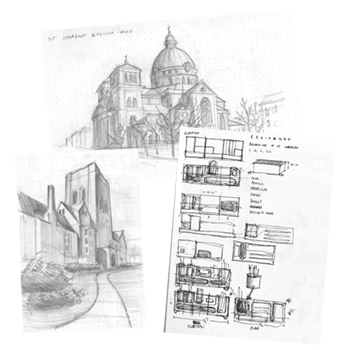
Start thinking in three dimensions as you draw—how do 2D drawings translate to 3D forms? Doodling buildings, objects, people, plants, or animals, or even just shapes. When quickly communicating ideas with lines and value, try your best to think in three dimensions. How do 2D drawings translate to 3D forms? Being able to express your visions with pencil and paper is an important starting point as a designer. Sketching helps you develop ideas and begins to plan out the modeling process. For examples and exercises, head over to the sketching, perspective drawing and drawing type journeys. Sketch simple three dimensional shapes in plan, section, and axonometric and build them out of clay
Activity 2 – Gather and Acquaint Yourself

Collect whatever modeling supplies you can get your hands on—whether it’s balsa wood, paper, cardboard, foam core, or anything else! These materials come in different thicknesses or plies, which allow you to create variation in your models. You will also need a Xacto knife, a matte knife will blades, scissors, tacky glue or white glue, a gridded cutting board, and a cork backed metal ruler. The cork keeps the ruler from slipping when you are aligning it to a grid on the cutting board. All these materials and tools are available at most arts and crafts store. What are the advantages and disadvantages of each material? What kind of shapes can you create? Etch a score or a half way cut through some cardboard; don’t cut all the way through. Now you can fold the two pieces while they are still connected. Try etching regularly spaced multiple scores in a piece and then gently fold the cardboard into a curve. Make some simple volumes like a cylinder, triangle, cube, or rectangular box.
Activity 3 – Interior Models
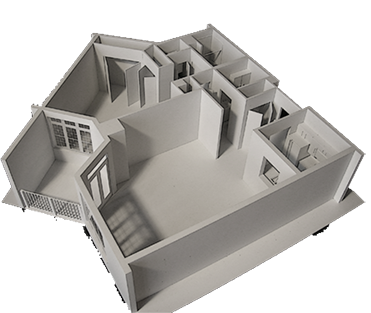
Now that you have more experience, model the interior spaces of your home. If you don’t have any floor plans or elevations, don’t worry! Measure the height, width and length of the rooms noting the placement of all doors and windows. Transfer your measurements to scaled drawings at ¼” = 1’-0”. From here, start modeling. Detailed models use paper stock of different plies to indicate the layers and thickness of walls. Take a close look at your home—where are the doors and windows located in the elevation of the wall? How are the rooms shaped? Once modeled, take the project a step further by creating furniture and appliances.
Activity 4 – Existing Building Models

Search the internet or go on location to pick out a building that you want to model. Find photographs (or take your own) of the building from different angles to get a sense of its shape and proportions. To build an accurate model, look for floor plans, sections, and elevations. Floor plans are aerial views of a building’s layout, sections are 2D views of the interior, and elevations are 2D views of the exterior. Having both will allow you to base the pieces of your model on the drawings. Once you have these plans, print them out. The size of the images will most likely need to be adjusted to match the scale you want to build the model. Use a proportional scale wheel to measure the plan and rotate it to find the dimensions you desire, or match up the sizes of the plans digitally using Photoshop or similar software. After printing the plans, cut out a base for your model and paste the floor plan onto it. Now you’re ready to start building up vertically!

Activity 5 – Detail Models

Detail models are maquettes of parts of an object, space, or building that require additional and close up study. Some detail models are constructed full scale! Curtain walls, or walls of skyscrapers are often studied in detail to see how different materials best go together and to test sun transfer, water resistance and run off, weathering, etc. Make a full scale model of some part of a building. Be prepared to use or simulate real materials!
Review
- Photographs are the best way to determine a building’s dimensions.
- Sketching can’t help when it comes to making models.
- Floor plans are used to set up the bases of models.
- Architectural models are only for final presentations.
- What tool is designed to convert dimensions to different scales?
Explore
- Architectural Modeling on Wikipedia
- Architectural Modeling Techniques
- Architectural Models on Pinterest
- Association of Model Makers
- Epilog Laser
- Modelmakers
- Model Making Tips
- Models of AL_A
- Models of Atelier Bow-wow
- Models of Bjarke Ingals Architects
- Models of Carme Pinos Architect
- Models of Carol Ross Barney, Architects
- Models of Christian Portzamparc
- Models of Frank Gehry
- Models of Frank Lloyd Wright
- Models of Guadi Architecture
- Models of Henning Larsen
- Models of I.M. Pei
- Models of Jeanne Gang Architects
- Models of Jean Nouvel Architects
- Models of Le Corbusier
- Models of Lousi Kahn Architects
- Models of Mies Van Der Rohe
- Models of Norman Foster
- Models of Rem Koolhaus
- models of Renzo Piano
- Models of Ricardo Bofil
- Models of Ricardo Legoretta
- Models of Richard Rogers Architect
- Models of Sanaa
- Models of Shigeru Ban Architect
- Models of Tadao Ando
- Models of Tsien & Williams
- ONEOFF
- Sketches of Frank Gehry
- The Architect's Guide to Tools
Relate


All contents copyright © NEXT.cc. All rights reserved. Terms of Use